
Contact form in JavaScript is one piece of websites that you will get to know as a web developer. This is a common place for users of a website to start a conversation with seller or author, company, freelancer….
We have a web development bootcamp, and at the end of each bootcamp, there is a project our students must implement. They choose a project of their own. But one question stays the same, how can I add a contact form. After all, they all have the knowledge to build it but still, having an example makes everything easier. So, here we go.
Having some knowledge about how to make a contact form in JavaScript is a must so let’s start. You can also take a look at what skills does a Web developer need or test yourself with our acrticle on the practicale approach.
To create a contact form in JavaScript, you need to:
- Create an HTML for the Contact form
- Read values from the Contact form
- Check values of the fields on the form
- Use the values from the form (send to the server, display values…)
How does a contact form in JavaScript look like?
Contact forms in JavaScript look very similar, most of the time there is an input field for name, surname, address, email and of course for a question or a message.
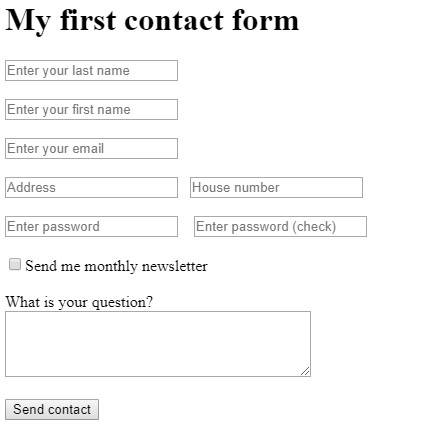
Making a contact form from the image above is our goal.
Before we start creating our contact form in JavaScript, we need to cover some ground.
Input fields in HTML – Fields for forms
Here is a brief list of input fields that you can use:
- Text
- Password
- textarea
- File
- Select
- Checkbox
- Radio button
- Html5
- Dates (DateTime, time, week)
- color
- Range
- Search
Different types of input fields are great if you want to make an input easier for the user. For example, with date types, users can pick a date from the calendar like input (depending on the browser). HTML 5 brought even more fields to the table that make entering values for users easier. With a bit of practice, you will learn which types to use. Moreover, in this article, we show the usage for most of them. We also have a great article on creating a JavaScript list filter.
Creating an HTML for the Contact form
You can go wild, making this contact form stand out. But we will showcase the most common elements; you should have or should I rather say can have on your contact form.
HTML template
HTML

First, we need a good template for our HTML (we have one on our What is HTML blog post, check it out). Next, you need two additional files; one is for CSS and another for JavaScript. You will link to those files, as shown above in the head tag.
1. Add a Link to a CSS file
We add a CSS file to our HTML with the link tag. Also, beware that we have a CSS in a separate folder named lib. You can put your CSS file elsewhere.
Contact form JavaScript link to CSS
HTML

2. Add a Link to a JavaScript file
We will add a JavaScript file where we define all our functions. Again our scripts.js is in the lib folder. If you want, you can put it elsewhere but careful, because you must also change the path to the JavaScript file.
Link to JS
HTML

3. Next is the title
Put the title h1 tag in the body. The value inside the tag is “My first contact form”. But feel free to change it.
HTML title
HTML

4. Now we add the first form in JavaScript
Actually we will add a form in HTML file, but nevertheless, this is what our blog post is all about Forms in JavaScript.
First form in JavaScript
HTML

You can see that we have also set the attribute onsubmit to the form tag. We use the onsubmit event to return false. In short, this means that the form will not redirect to another page (or will not reload). We do this to control, what will happen when we press the button.
5. Add a first input field for last name and first name
Now we start adding input fields. First, we will add an input field with type="text" set the attribute id to the lastName field. Add a few br tags at the end to make some space (you could make spacing using CSS, but this time we will use the br tag).
Form input field
HTML

What is a placeholder attribute? Placeholder is an attribute for the description of the input field, the text that is visible when the input field is empty. In our case enter the value “Enter your last name”
Add an input field for the first name as well. In fact, the only thing that changes are the id and the placeholder. The id should be firstName, and the placeholder should be “Enter your first name”.
Form input field first name
HTML

6. Add a radio button selection for gender
When we want to add a radio button choice, we need to add input fields of type radio for all the choices we offer in the form. Text for a radio button is a simple text that follows the input field. We also need to add a name attribute. name attribute groups together radio buttons with the same intention, for example for gender this lets browser know that only one of the radio buttons in group “gender” can be selected.
Forms in JS - Radio button HTML.
JavaScript

7. Add an email input field
We could use the input field of type text for the email as well, but this is not perfect, that is why we use a different type of input field for the email. Uniquely, for the email, we use type="email". Furthermore, the id attribute is “email” and the placeholder “Enter your email”. Add br tags at the end.
Form input field email
HTML

8. Address and house number input fields
We now add two more inputs to get the address and house number of a user.
Form input field address
HTML

We are already familiar with type text; the new addition is that we want these fields to be stuck side by side, with some spacing. We use to make spacing without the help of CSS. This is a non-blank space, and the browser will not group it to a single space. For exercise: Try putting 3 spaces in the HTML code, only one space will appear.
You may notice that the house number is of type text, which is plain text. Ordinarily, you can choose type="number" as well, but in some countries house numbers also have some letters beside the number, and this kind of field would not work well for this example.
9. Adding the country field and an HTML select tag
List of countries is usually a well-known list, so most of the time developers choose to have this as a drop-down list to select from. We do the same. For this, we need a select HTML tag.
Form in JavaScript drop-down
HTML
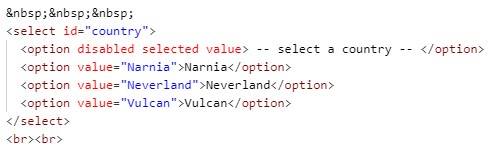
We have a few once again to make spacing after the house number. Also, some trailing br tags to make spacing after address fields.
The select tag has a few options in it. Each option represents a country. You can enter the list you want or find a good list of countries on Wiki or some other source.
9.1 Default selection for the drop-down list
It is important to know that there is a special option in the list. The first one is meant to be there when we want users to pick a value, and this is an option selected by default, and that can not be picked.
Default selection for the drop-down list
HTML

10. What about the password?
We know that password is not the most common element when building a Contact form in JavaScript, but we wanted to showcase a validation of a password as well. Not to mention, that you should feel free to remove fields for the password if you do not need them.
Form in JavaScript password
HTML

It is important to set the type to type="password" as it changes the way the input field behaves when you enter a value. It hides the value, so that people overlooking can not see the value, this is very useful for offices, public places and also when recording your screen. The value of 123456 would look something like this:

Reading the value is the same as for all the fields.
11. Add a checkbox for a newsletter or any other options
Most of the time, you want users to check some options like the newsletter, sending a copy to your mail or agreeing to the terms of the operation.
Form in JavaScript input checkbox
HTML

For the checkbox we use type="checkbox", this shows the checkbox on the screen without text, so the text for the option should follow your field. In our case, we add plain text, but you can format it using a span or any other tag.
Again, at the end, we have breaks for space.
12. Add a way for users to add feedback
Contact forms are all about getting feedback from users; most of the feedback we can get using options, drop-down lists and single-line fields. These are the best as it is easy to store the values and even easier to manage data and responses.
But sometimes we just need a full written question or opinion from the user, and this is where we use <textarea>.
Form in javascript textarea
HTML
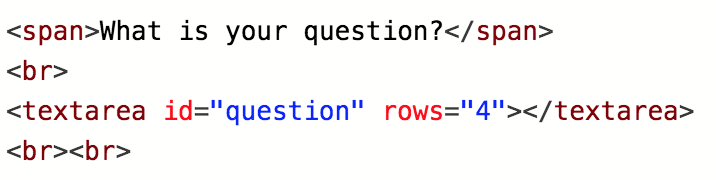
<textarea> is a tag that enables multiline input. The most useful attribute is rows, as we can set the number of input lines. But we can also add a custom size for textarea and then the size implies how many lines users have according to the font size.
13. Add a submit button to send values for the contact form
At the end of the contact form, we need a button to send all the values entered by the user. We need a <button>, that will call our function sendContact().
Form in JavaScript button
HTML

Buttons are submit buttons by default, but we wanted to change that, and you can remember that we added onsubmit="return false" to our form at the beginning. This way, we have all the control, but we need to add an onclick attribute like this onclick="sendContact();" to our button as well.
Reading values from the Contact form in JavaScript
The values we read from the Contact form in JavaScript are the most important aspect of the contact form because you need them to communicate with your users. Different fields have different ways of reading values.
Reading Value property for the input field
Most of the components we added to the contact form have a value property and reading a value is as easy as using an id and the value property, e.g.: firstName.value
Fields with value property:
- password
- text
- textarea
- select (drop-down list)
- checkbox
Reading value for the radio button input field
Reading the radio button value is a bit different. We have to link the radio buttons into a group since only one can be selected. A perfect example is gender, where the user can select only one option. Having more fields grouped together implies that we need to work with an array of fields. There are a few ways we can do that; you can choose the best option for you as you please
Predefined radio button values
If we only have a few values, like gender, we can name the fields and read the checked value directly. And then get the value using some kind of comparison.
Predefined radio button values
JavaScript

Notice, that male is an id for our radio button for “Male” gender, this way we can access the field directly, using the id. Next, we read the checked value if it is true we know the value is male; otherwise, it is false.
Generic option for getting value of radio buttons
There is a generic option for getting the selected input field for a radio buttons group. This comes handy if we have a lot of radio buttons or if we read them from some kind of list and at the same time can not have all the ids predefined.

We can get the field with querySelector using the radio group name, in our case gender. With querySelector we can also instruct for the field to be checked, this way we will get the radio button that is selected. There is one downside, we have to check if querySelector returned null, this means that the user did not make a selection. If you want you can read some more about how to create HTML elements in JavaScript.
Gender radio button – getGender function
We need to add a function to do this for our gender radio button, and we will call it getGender().
Gender radio button - getGender function
JavaScript

The function simply returns the value of the querySelector method. In addition, if you change the name of the radio button group, you need to change the querySelector as well.
Making our Contact form work using JavaScript
We have prepared all the components, and we have briefly explained how we can read the values of the components in the Contact form. But now we will show how this looks in an organized example. For this, we start working in scripts.js. We go step by step and explain why we chose that kind of implementation and how it works.
1. Group all fields into an object
When you are working with a lot of fields, it makes sense to connect them in a group. This way, accessing them is easier. We do this with an object, we define the object at the beginning of the js, because we want for it to be accessible globally.

2. Linking all the fields to our fields object
We can link all the fields on the DomContentLoaded event. Furthermore, we get all the fields using document.getElementById method since we have set ids for all our fields.
Linking all the fields to our fields object
JavaScript
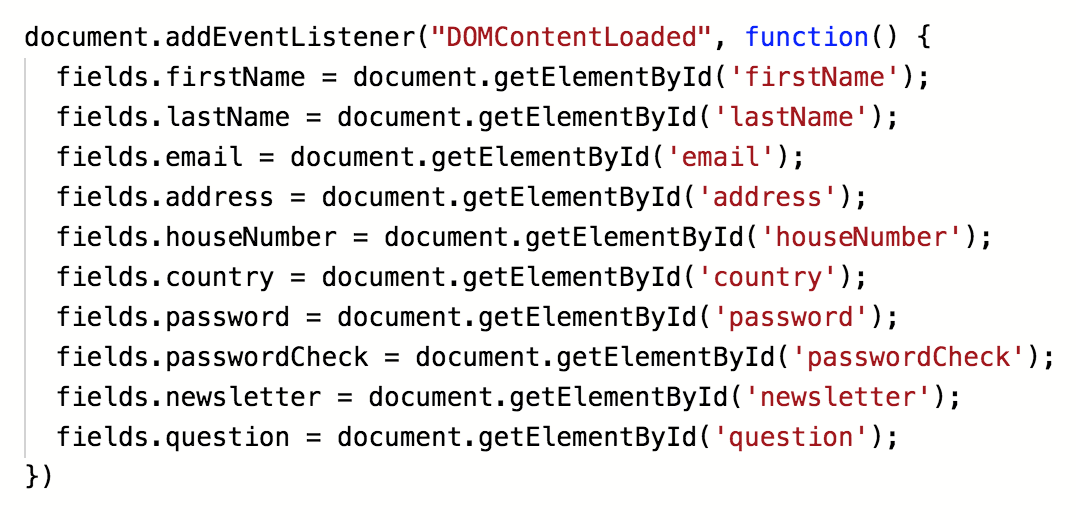
Because we do linking in one place, the code looks pretty neat. If we used getElementById every single time we use fields and their values, there would be a lot of code, and we don’t want that.
There is one exception, for gender, as the selected field changes with user selection, so does the field we need. That’s why we link that field in the sendContact function.
3. Checking the values entered in the contact form
We need to check values entered in the contact form with JavaScript. Checking the values and making our data cleaner is an important step. Moreover, this means that we will collect data with fewer errors. For example if we check that the user entered both name and surname, this makes data better.
We prepare functions, that will check specific values, like if field value is empty and if the email address is in the correct format. Later we combine all the prepared functions in a slick and clean isValid function, that checks the whole form.
3.1. Checking that the field is not empty
Checking if a user entered a value is one of the most common checks. This is why preparing function isNotEmpty makes a lot of sense.
Checking that the field is not empty
JavaScript
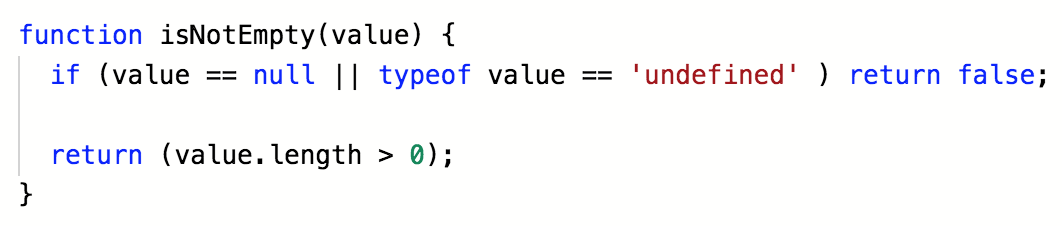
The function is split into two parts, the first part is the first line and it checks that the value is not null or undefined. Nothing wrong if it is, but in that case, we can return false as this means that the user has not entered the value. This also prevents errors in the last part. Read more about Loops in JavaScript.
The second part is checking that the value is one or more characters long. Input fields can have empty strings for an empty value.
3.2. Checking that the field value is a number
If we have a field that is supposed to be a number like a house number, it makes sense to check if the user entered a number. Bear in mind that in some countries house number can also have some letters, but since we are learning javascript we can leave this behind.
Checking that the field value is a number
JavaScript

In order for the value to be a number, it has to have some length, that is why we check the length, then we use a negated value of isNaN JavaScript function that returns true if a value is NOT a number.
3.3. Check if a string is an email
We have already set the type of field to email, but checking the value once again, makes it safer. Checking email is important since most of the time, this is the only way of communicating with your users. Checking the email makes sure that we have a better email list. (see function isEmail below)
Check if a string is an email
JavaScript
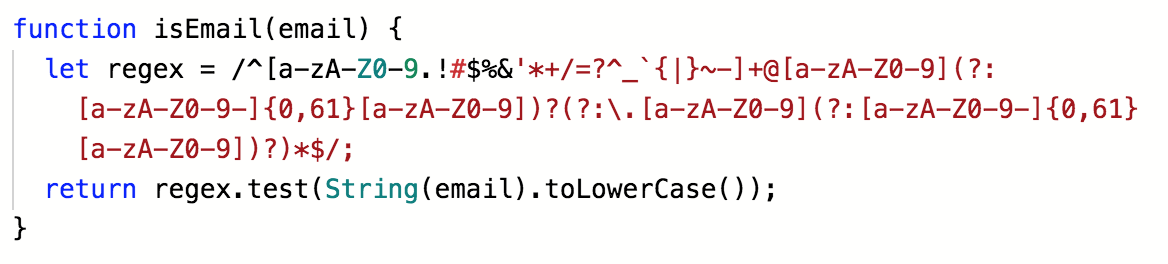
We check the string value with the regex expression. Regex expressions are hard to assemble by yourself, but luckily there are a lot of examples out there. This is a good/performance version of the email regex, but you can find even better libraries, that also check against top-level domain names.
3.4. Check that the password is valid
We check passwords to make them safer, this function only checks if passwords are long enough. In fact, there are far better functions out there that check for the type of passwords as well (if they have numbers and special characters inside, if the password is too weak like 1234 and os on; for a stronger system you should use a more elaborate function). We are here to learn the concepts of the contact form in JavaScript, and checking the length is enough for now.
Check that the password is valid
JavaScript

We only check if the password is longer than 5 characters, and we do this with the length() function for the string.
3.5. Field validation function
We prepare all the validation functions in order to use them with the main validation function, called fieldValidation. This function checks the condition and colors the field red, if there is an error, this makes later use simple and clean, since we do not do this for every step.
Contact form in JavaScript field validation function
JavaScript
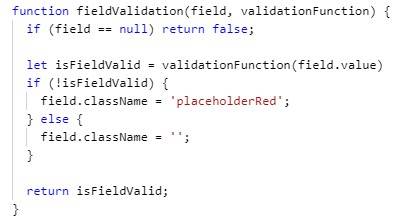
We have two parameters for this function. First is the field itself (text, password, drop-down, select…). The second parameter is the validationFunction, this is one of the functions we described before (isNumber, isEmail,…), but you can add yours as well.
First, we check that our field exists, if it does not, then we know that this is not a valid field value. The next step is to check the validity of the field value. We do this passing the value of the field to the given function, the code for this call looks like this:

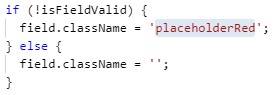
Next, we check the value and color the field, using CSS class placeholderRed. If the field is valid, we set the className to an empty string, to clear the formatting.
In the end, we return the value of validity.
3.6. isValid function – combine all the checks
isValid function is a central function for checking the validity of our contact form, here we combine all the checks we need.
Form in JavaScript isValid function
JavaScript
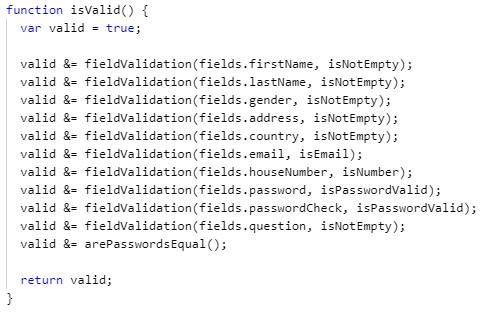
Now you can see that by using general functions we can make it look really sleek. All you need is a field reference (which we have in fields object) and a type of check we want to do.
At the end, we just return the combined value of our check.
There is an exception at the end of arePasswordsEqual. We have this exception to show how you can add a custom check, and because we need to check two fields at the same time.
3.7. Custom validation check – Are the passwords equal
In this function, we check if the password field and the passwordCheck field have equal values so that we store the password the user wanted to have (not to store the mistake).
Form in JavaScript custom validation check
JavaScript
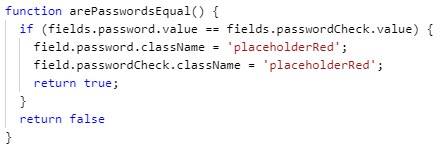
This way, we do a custom check, and with that, we also need to write custom code to show an error. We do it in the same way as for the other fields, but this could be a totally different code.
Making User class and sending contact form
User class constructor
We use User class to show you that using a class you can combine multiple values under the same roof. This makes it easier to work with complex values, like in our case user’s contact data.
Form in JavaScript user class constructor
JavaScript
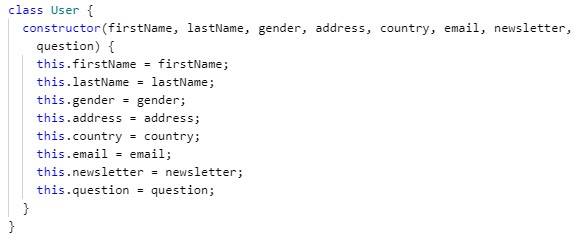
All we do here is prepare the constructor method that will take all the values for our User class. For the most part, the code is easily readable, and the names of parameter imply what their values are.
Sending the contact form data with JavaScript
sendContact is the last function we will implement. It is the main function we call from the HTML button on our Contact Form.
Form in JavaScript sending the contact form data
JavaScript
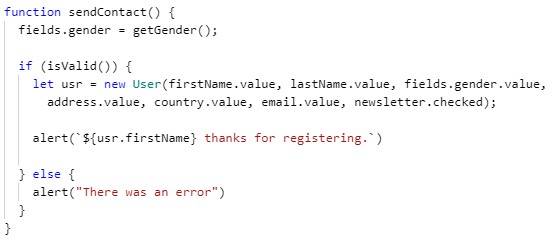
The first thing we need to do is to refresh the value for the gender field. We do this using the getGender() function, and it will return the selected radio button field for gender. Next, we check the validity using the isValid function. If the value is true (and the contact form is valid), we create a new User object. Now you can see how you can use a constructor with fields we prepared for the user. After the successful validation, we show a simple alert to show that we processed the data of the user. That is why we use the firstName of the user in our message.
Showing errors on the screen with alert
In the function sendContact we show another way to show errors on screen using a message box. This is a good way of communicating important messages to the user. Additionally, the message box will focus on the screen and grab the users attention.
Conclusion
We covered how we can read values from different input field types, and we have shown how to manage radio buttons. Furthermore, we showed important parts of processing the contact form information, like checking the validity and combining all the data into a useful object (learn mora about data in JS in our article JSON in JavaScript. Please let us know here at CodeBrainer if there are any mistakes, or if you think we could explain anything even better; this way you will be helping future readers.